
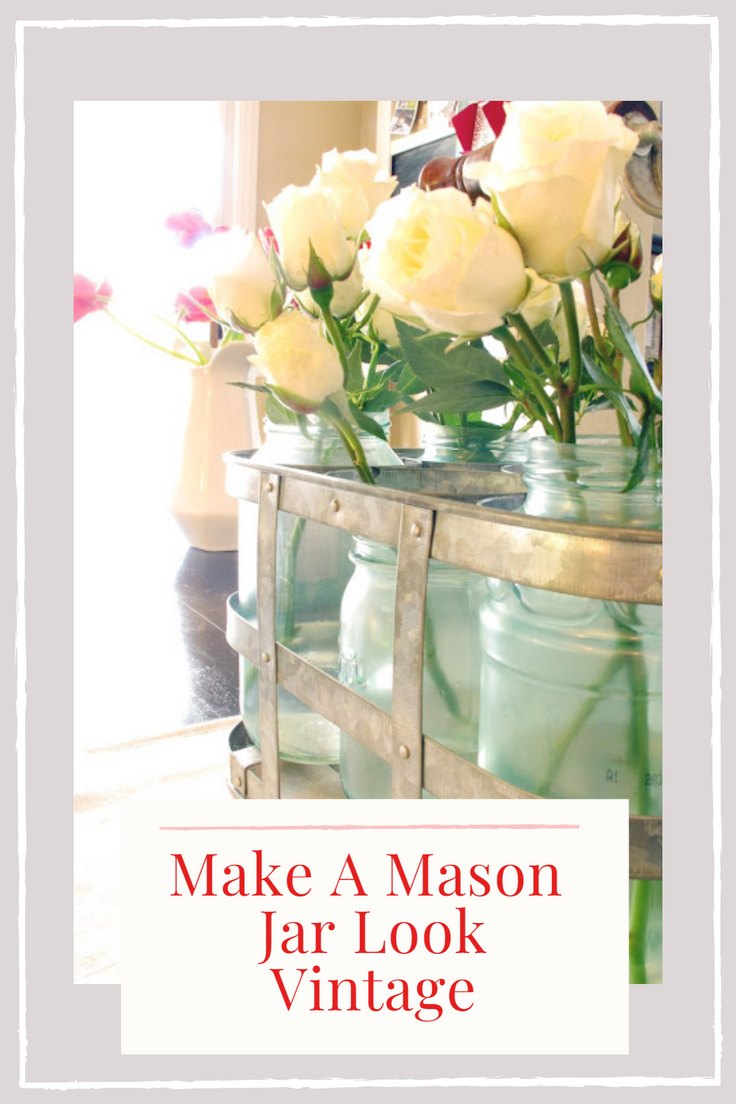
Creating your own vintage jars
Transform a plain mason jar into a vintage-aged centerpiece with this DIY project! Using just mod podge, a paintbrush, a few drops of blue food coloring, and a mason jar, you can easily create a beautiful aged look. Let’s get started!

The hubby brought home some beautiful flowers for me, so I decided to play around with some of my recycled mason jars.
Supplies:
1 tablespoon of mod podge
1 teaspoon water
3 drops of blue food coloring
1 drop of green food coloring.
1 teaspoon water
3 drops of blue food coloring
1 drop of green food coloring.
Directions
You can play around with the colors as much as you would like.
Simply mix the mod podge, water, and food coloring together and paint the color on the outside of the jars
This is how it will look immediately after you apply the mixture

About 10 minutes later

About 20 minutes later you will end up with a beautiful-looking vintage jar. Maybe walk away during the dry time (just kidding) so you don’t get worried they aren’t going to turn out.


Let me know if you give this a try, it’s so pretty!

Love how they turned out! 🙂 Rachel
I love the green tint in yours. Beautiful.
Very cute project Kristin! I love the colors!
Have a great day.
Pam
They look so pretty, I must try it. Love that caddy!
Very cute…thanks for the instructions…I have to try this!! Love your caddy, too!
XO,
Jane
I love this!! What a great project!! Thanks for sharing!! We actually have a caddy…or several at the shop and this would be great to do for a display!
Hope you are doing well!
Carolyn
mulberryheightsantiques.com
What a sweet hubby! Love this idea so I will be trying it soon. And LOVE that caddy!
How pretty, Kristin! They look lovely with those beautiful white roses your sweet hubby brought you.
What a great idea!
Kristin- They turned out great~! Your hubby brought you flowers? Is he looking for an OLD girlfriend-cuz I LOVE getting flowers! ah..never mind…it wouldn't go over too great with MyHero! xo Diana
I love them. They are on my wish list. I can just picture them on a white shelf in my art room. Yoursturned out lovely. Big Hugs my talented friend!
Ohhhh – LOVE these Kristen! They turned out beautifully! Going to "pin this" idea.
They turned out wonderful Kristin~ I love them and what a sweet hubby 🙂
This is a great idea! I love how they turned out! I'm going to have to try this. Thanks for sharing!
We painted some of these for my daughter's wedding and just loved the way they turned out. Now I'm on the look out for one of the caddys like you're using!
What a great project! I have several old pickle jars that would be great for this. Thanks for sharing.
What a great idea! Thanks for sharing, I will have to give this a try. I love yours in the caddy, so adorable.
~Shanon
Those are just darling. I love them. You always have such a way with displaying things in such a beautiful way. And what a sweet hubby!
Love the look of those jars, I will make some, I just have a question, can you wash them? or once you wash them they need to be re-painted.
Have a great week!
XXX Ido
I LUUUUUUUURVE it! I totally am going to do this:-) Thanks for sharing, they are beautiful!
Cat
@catherinascreativecorner.blogspot.com
Your jars look great! Vintage look without the price!
Thanks for the shout out! So glad you enjoyed the project. They look fantastic.
great and easy and lovely project, something I can even handle!!! and I even have a similar caddy that I bought in Home Goods last year and have done nothing with it!!! so I'm happy… thank you!!!
Angela from NJ
This is great! Thanks for the link to the instructions. I need to make time to do this one….
I love them! They turned out so cute and look perfect in the caddy with the flowers. 🙂 I was thinking about trying them today but got side-tracked with cleaning windows! Not really sure what I was thinking. 🙂
I hope you are doing well and things are going good in the bathroom.:)
xoxo
Such a soft, pretty color, Kristin! I'm going to have to check out the tutorial! LUV them in that carrier! 🙂
xoxo laurie
I love this look!
Brenda
Such a clever DIY project! Also, love how it was not a ton of time and energy to get something so great. M.
Can I say LOVE. GORG. LOVE. GORG. LOVE. GORG…. LOVE!
thanks for sharing it with us all. winks-jen
super cute! i love the carrier too looks like an old one i have!! hope you are well! susan
They look beautiful! I actually bought all the supplies for this project about 6 months ago. Then I ended up finding some vintage blue/green Ball jars at a market, and never got around to creating the new ones. You have inspired me to revisit that project 🙂
Precioso el color de los nuevos botes y por supuesto felicitaciones por tener un marido tan adorable flores para su mujer eso no lo hacen todos jejejej.Bss Josefa.
Love it! I can’t wait to try this.
Kristin, these turned out beautifully! Thank you so much for sharing the how-to – I want to try this in pink! 🙂 Pinning and have a happy week!
Your jars look great and really authentic, too!
These turned out so well. I love the color. Adding to my to try list!
Fantastic idea Kristen!! I love how you styled them too! Just beautiful… Pinning!!
Kristin these are gorgeous! I love how they turned out. Pinning! xoxo
Very cute. Glad you showed the process, I would have worried about them. They came out lovely and think of the colors you could create. Will pin this to try later.
Cindy
Gorgeous! Stunning! I really can’t believe how real these look. 🙂
Thank you so much Bethany
What a neat idea! And I love the metal basket you put them in. We’d love to have you share this at our weekly link party! Hope to see you there! http://www.thelifeofjenniferdawn.com/2015/12/8-things-to-make-this-winter-and-little.html