DIY Easy Wooden Christmas Sign
I am a huge fan of custom wooden signs, but I’m not great at hand lettering, don’t own a fancy cutting machine and I’m a very messy stenciler. So what’s a girl to do?
Invest in wall decals. Yup! Decorative wall stickers are easy to work with, come in all different shapes, sizes and sentiments and are readily available at craft and dollars stores, online too. Plus, they are usually just a few bucks, less if you have a coupon, even better.
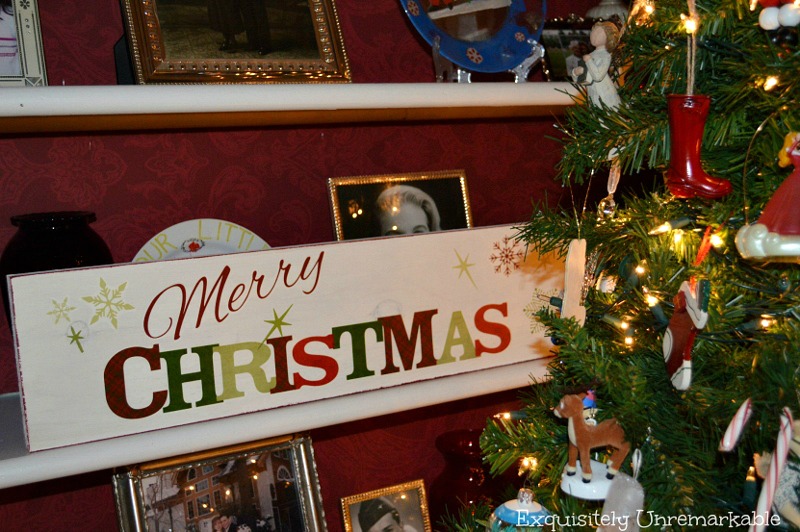
I picked up my sticker at the craft store, in the seasonal aisle. I took it with me to a big box hardware store, where they cut a piece pine for me in the exact size I needed. At home, I grabbed white craft paint and a foam brush and starting painting my board. I did not prime it, I wanted the knots and rough texture to bleed through. I’m a rustic cottage girl.
As an accent, I dipped my brush in a bit of red paint and dabbed it around the edges to create a faint border.
When the paint was dry, just a few minutes later, I peeled my sticker away from its backing and stuck it to the board. I used my hand to smooth out any bubbles and secure it. Keep in mind that these decals are made to be removed easily from a wall without damage, so lift and peel to reposition if necessary. It’s a very forgiving process.
A quick coat of decoupage gel will seal your artwork in place. I used one with sparkles. I mean it is Christmas, after all.
My sign is a shelf sitter, but with the addition of a hook, yours can hang on the wall. It’s up to you, I say have fun with it.
That’s it, so simple!
Well, this was fun! Kristin, thanks again for allowing me to meet your sweet readers and share a little holiday decorating cheer….and like the sign says, I wish you all a very Merry Christmas!
Thank you so much Kim for guest posting for me today. If you would like to see more of beautiful home, stop by and see her cottage tour!


