
Bookshelf Transformation
Thank you so much, Kristin, for inviting me over today! I love the fun vibe you guys have over here and getting in some girl time is always welcome!
I’m Dana from Happy Little Lovelies where I chat on and on about the handmade business world, my shop, fun ways to spruce up our homes for cheap, simplifying where I can, deep thoughts, striving to balance it all with being a wife and mom… and staying real about the good and the hard of it all. No one’s perfect after all.
Today, I’m showing you one of the easiest and cheapest ways to update a boring bookshelf. Cause I’m all about the easy and the cheap.
This is the story of a sad, little bookshelf that used to look like this…

I’m pretty sure it was a $20 Target buy for the boys’ room and I lined the back of it with contact paper to, you know, make it “pop.” Does anyone else hear the Debbie Downer wahh wahh in the background?
Well, it’s in Zoe’s room and it has looked like this for almost a year now….I’ve done zero with it since she was born. Sadness. I was sitting on her floor the other day getting ready to clear out old diaper and wipes boxes and the mood hit. Thanks to page 24 of the Petersiks awesome little book, I knew exactly what I wanted to do. Prepare your hearts, friends. You’re gonna want to run around like a crazy person, updating all the shelf backing in your house.
I didn’t want to have to paint or do anything that involved taking out the million tiny nails that holds the backing on. I already had the free cardboard from the diapers and wipes boxes and, thanks to my shop, I have quite the cute fabric stash. I think you can probably see where I’m going with this.

All I needed was the cardboard, fabric {I used about 1 1/2 yards}, scissors, tape measure, tape and a spray bottle {to get wrinkles out}.
Here’s the process:
1. Measure the height and width of your shelves and write it down.
2. Flatten out your cardboard, mark your measurements and cut it to size. If you don’t have cardboard, foam core is an easy alternative that can be picked up from most big box and craft stores. Hobby Lobby had a big piece for about $5 yesterday.
Slide it into the backs of your shelves to make sure it’s a good fit. I ended up having to trim most of my pieces.
{Say hello to my dust….}

3. Grab your fabric and lay the cardboard piece on the wrong side of the fabric. I found that I needed to make sure the printed side of my cardboard was up because otherwise, the box showed through my fabric.
Cut the fabric around your cardboard, leaving about 1 1/2 inches or so of extra border to wrap around.

Is everyone ready to get fancy?
4. Pull your fabric border over and start taping. When you’re done with one side, do the opposite side and until all 4 sides are pulled pretty tight and secured with lots and lots of tape.
Now fold your corners in and tape the crap out of them.

I just sort of gather the fabric, press it flat and tape. No one will see it so just get it to where it looks ok from the front.
And I guess you could do this with a glue gun if you wanted to. But then that ups the level of fancy because you’re involving electricity. We’re trying not come across as pretentious, mkay?
5. If you have a few wrinkles, just mist over them with a spray bottle and smooth out. There is simply no need to whip out an iron. In fact, this is how I “iron” normally.

6. Just pop them into the backs of your shelves and you’re done!

Now the fun part of styling your shelves begins. It’s so much nicer when you have a cute backdrop, don’t you think?

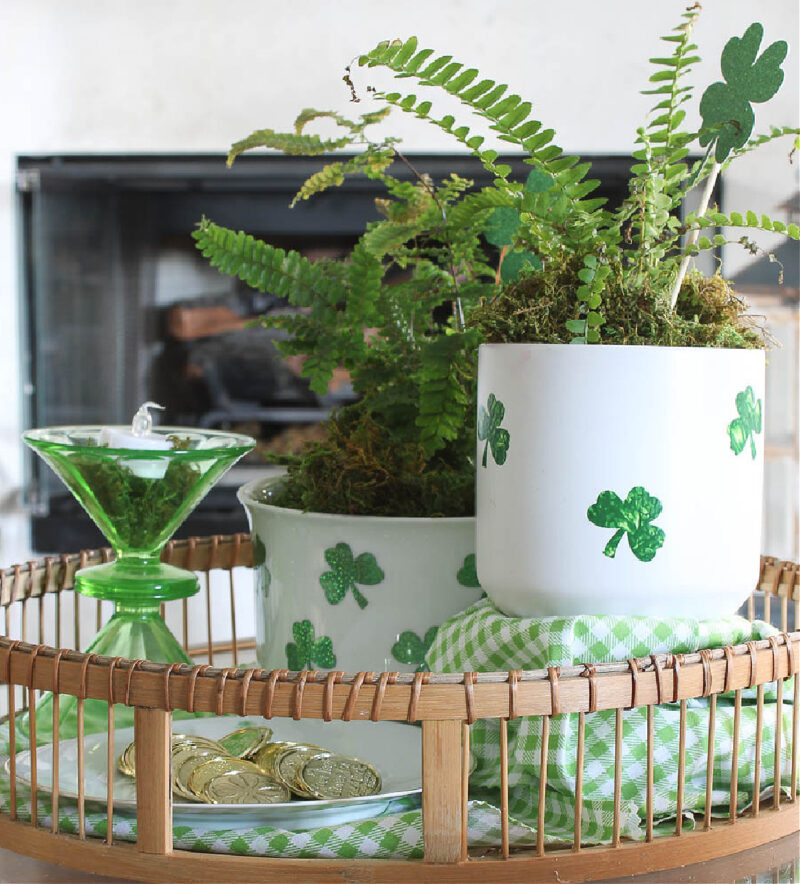
I got rid of a bunch of junk that was cluttering up the shelves and only filled it with stuff that’s meaningful to us: my very first Precious Moments bible, a chalkboard that I made with an old frame, well worn books that the boys and I read over and over {and over and over…}, one of my favorite Katie Daisy prints, a cute little rocking horse I found at an antiques market, fun toys and a hideous thoughtful stand up doll that her big brother colored and wrote a letter to her on the back:

“Zoe I love you. I want to see you smile Zoe. Do you like me? I am sorry I scared you. I might buy you a toy. I love you. Signed Isaiah. “
I mean, I had to keep it, right?! So precious.
So here’s what a completely free {I already had everything, but this is cheap even if you don’t}, super easy and quick project got me:

I’ll take it. I also just love the fact that whenever I get tired of that fabric, I can recover it with new fabric in a matter of minutes.
Now, all I can think about is finding more shelves that need updating. Last year, we decided to take the doors off our kitchen cabinets to get an open shelving feel. We never did go back and paint the backs of those shelves….ding ding ding!!!
What are you going to cover?
Thank you Dana for stopping in today! You can find her fabulous ideas all over the place, stop in and say hello! Thank you Dana for guest posting for me today!
Love your fabric choice, looks wonderful!
Super cute project! 🙂
Vanessa
How cute is that! Looks great
So cute!
You now know for that reason considerably with reference to this kind of issue, made me in person trust me from the number of different facets. It is just like males and females are not curious until it’s one thing to employ Woman gaga! Your personal items exceptional. Always contend with up!